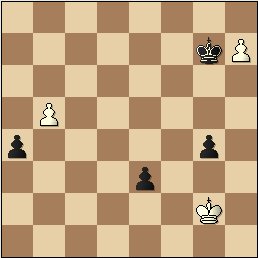
Diagram 1 Black to Move
How do you assess the position? What should Black do?
Advancing the Pass Pawn - Threat vs. Execution
In my opinion, promoting a pawn is one of the most exciting thing in chess. Rarely, however, the promotion goes uncontested. It is more common that an opponent can stop the promotion for a certain price – material or time. The question is – what is the right price. Not only one must gain material, but also foresee how it will influence the subsequent flow of the game.
Let's start with this relatively simple example from the game of two boys, both are my students and rated approx. 800.
|
Diagram 1 Black to Move How do you assess the position? What should Black do?
|
Please stop – SOLUTION is below.
Black K just snuck on g1 and is ready to help the pawn to get through. White's last move was 1.Bh1-a8 and Black responded 1…Ph1Q. I was watching the game from few feet away and wasn't sure who was going to win up until the last Black’s move. After 2.Bxh1 Kxh1 3.Kd6 and 4.Pc5, White easily won the game. Of course, in the staring position Black should be losing no matter what he does. After 1...Kf2, or any other move, White will simply play Kd6, Pc5 and then Pb6 at the right moment, getting Pa through.
However, the Ph2, while it was on the board, presented a serious threat. It is not that unlikely that 800-rated player playing White piece would have placed his K on d5 or pushed his Pc4-c5-c6, inadvertently cutting off his B and allowing Ph1Q. By playing 1…Ph1Q?? , Black eliminated White's opportunity to make a mistake.
Conclusion: Black Pawn H2 created a strong Threat, but advancing it - was a weak Execution.
===================================================================
The next two examples are from the games of my long-distance student (approx. 1400). They are much more complex.
The first one was a pawn endgame:
 |
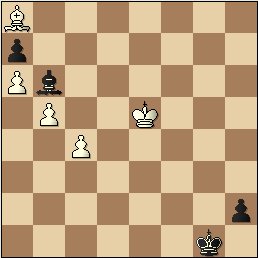
Diagram 2 White to Move How do you assess the position? What are plans for both sides? What should White do?
|
Please stop – SOLUTION is below.
A very exciting pawn endgame. Brief evaluation – Black Ps e3 and g4 are self-sufficient while defending each other (taking Kg2-g3xg4 allows Pe3-e2 advance and Kg2-f1 allows Pg4-g3 advance), but can’t make progress without the help of Black K. White has potential to create two separated pass pawns that Black K won’t be able to stop. Black K is already very active and is trying to win the Ph6. If he does that without losing sight of White's Q-side pawns, Black will win. Therefore, White must be in hurry to try and get the pass pawn on the Q-side.
Because this position is dynamic, we can can't clearly evaluate it until we do all of the calculations.
White played 1.Ph7?? Clearly this move is not in line with White's optimal strategy described in the paragraph above and it is a serious mistake. This move loses a very valuable tempo. 1…Kg7 2.Ph8+Q?? (losing another tempo) 2…Kxh8 3.Pb4 Kg7 4.Pxa5 Pxa5 5.Pc4 Kf6 and Black K is easily in the square of the c pawn. What went wrong – well White gave away 2 moves by pushing the Ph. Black would have to go to the h-file no matter what, so White must have seized the opportunity to start action on the Q-side.
Conclusion: White Pawn h6 created a strong Threat, but advancing it - was a weak Execution.
What should White have done? Well, there are three moves 1.Pa4, 1.Pb4 or 1.Pc4.
First, let’s look at 1.Pc4. Normally, the endgame theory suggest to start advancing the P that doesn’t have an opponent’s P on its way. However, in this situation. I am hoping you got the immediate feeling that it is too slow as the Pc is the closest one to the Black K. 1…Kg6 2.Pb3 (what else? 2.Pa3 Pa4! freezing the Q-side) Kxh6 3.Pa3 Kg6 4.Pb4 Pxb4 5.Pxb4 Kf6 and Black K is easily in the range (the square) of the White Ps.
A bit more aggressive is 1.Pb4. However, it also allows a freeze after 1…Pxb4 2.Pxb4 Pb5! Here it is not as devastating as in the above line (sub variation 2.Pa3 Pa4) since White can play 3.Pa4 (what else?) Pxa4 4. Ph7 Kg7 5.Pb5
Diagram 3 Black to Move
How do you assess the position? Who will win the pawn race? Or is it a Draw?
Please stop – SOLUTION is below.
Black wins easily after 5…Pe2! Compare this move with the 1.Ph7?? (in Diagram 1). I did criticize the latter. The difference is that in order to outrun White Pb, Black must lure White K to the 1st rank. Thus Pe moves forward. Notice that it doesn’t cost Black any tempos in the pawn race, since White can’t advance the Pb. 6.Kf2 Pa3 7. Pb6 Pa2 8.Pb7 Pe1Q+! (and Black wins!) 9.Kxe1 Pa1Q+.
Conclusion: in the Diagram 3, Black Pawn e3 wasn't as essential and thus presented a weak Threat. Advancing it was a part of the plan to lure White K to 1st rank enabling promotion of Pa was with check.
Back to Diagram 2. With the two out of three pawn advances on the Q-side losing (1.Pc4 and .Pb4), we will turn to the last one - 1.Pa4. After, 1... Kg6 2.Pb4 Kxh6 3.Pb5! (3.Pxa5?? Pxa5 4.Pc4 Kg6 and the K will catch the P) Kg5 4.Pc4 Kf5 (trying to ignore White's threats and promote K-side pawns via 4... Kf4 5.Pc5 Ke4 [or 5...Pg3? 6.Pxb6 Pe2 7.Pb7 Pe1Q 8.Pb8Q+] 6.Pxb6 Pe2 7.Pb7 [7.Ke2 Kd3] Pe1Q 8.Pb8Q will result in the drawn Q endgame.) 5.Pc5 Ke6 (5... Pxc5 6.Pb6 and the K is outside of the 'square' and won't catch the Pb) 6.Pc6
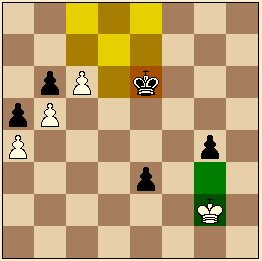 |
Diagram 4 Black to Move How do you assess the position? What are plans for both sides? What should Black do? |
Please stop – SOLUTION is below.
The protected pass pawn on c6 forces Black K to stick around. He can't cross the 5th rank. White K must shuttle between g2-g3 to avoid advancement of the Black Ps. Thus we have a Draw. 6...Kd6 7.Kg3 (7.Kf1?? Pg3 and Black wins) Ke6 8.Kg2=.
Thus if White played 1. Pa4, he would be able to get a DRAW.
Conclusion: in the Diagram 4, White Pawn c6 and Black Pawns e3 and g4 present serious Threats in their current positions. But can't be advanced unless opponent makes a mistake.
The second example from the game of my 1400 rated player is a B vs. N endgame:
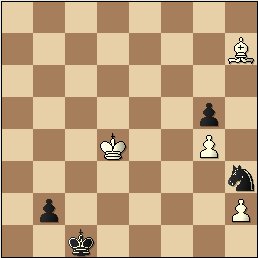 |
Diagram 5 Black to Move How do you assess the position? What are plans for both sides? What should Black do?
|
Please stop – SOLUTION is below.
Once again we have the Black K supporting the P on the 7th rank and the B controlling the square of promotion. The game continued 1…Pb1Q?? 2.Bxb1 Kxb1 3.Ke3 Kc1? (3….Nf4 would have been a final trap 4.Ke4 = ; if 4. Ph4?? 5.Kg2+ and Nxh4 winning). 4.Kf3=. Black can’t stop Kg3 and Ph4. Promoting the pawn and winning the B was a major mistake. It put Black K out of position and allowed White K to attack the N and force the trade of the last Black P.
Take another look at the starting position. By keeping the P on b2, Black keeps White B virtually out of the game anyway, so no need to make its ‘death' official. Additionally, Black has a threat of placing the N on c2 and getting the Pb2 ‘home free’. Because of this threat, White K can’t freely run to the K-side. So, the best move is 1…Nf2 2.Ph3 Nxh3 and Black has various winning ideas. Including, simply promoting the P and winning the B. I already discussed in one of my prior articles how the N can easily defend the P when the P is blocked by the opponent’s P. Check Example 2B here.
Conclusion: Black Pawn b2 created a strong Threat, but advancing it - was a weak Execution as it allowed White to reach a drawn position with a very little effort.
====================================================================
In Summary – when you have a far advanced pass pawn, consider the following:
When your opponent is able to defend the square of promotion and is ready to give up material:
Does winning the material specifically improves your chances? Is keeping the P on the 7th and maintaining the threat maybe potentially more beneficial. (Diagrams 1 & 5)
When your opponent's K or a Piece is defending your pawn and you plan to use it as a Decoy consider the following -
Avoid advancing your decoy, unless it didn’t yet reached the optimal position. The optimal position is usually the least advanced position that makes opponent’s K or another piece fully commit to the decoy and permits activity for your other Ps or pieces. (Diagrams 2, 3 & 4)
=====================================================================
How did you do? For comments send email or this
form
More on chess training (serious and enlightening)
| Chess Exam and Training Guide $24.95 + shipping | Chess Training Services |
Copyrighted @ 2006 Igor Khmelnitsky
For comments or permission to reprint please send inquires via email or this form