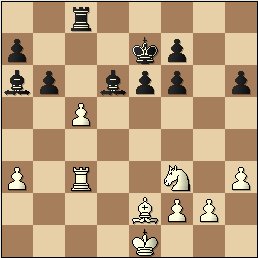
Diagram 1 Black to Move
How do you assess the position? What should Black do?
One vs. Many => Examples a Plenty!
Today
I have a mix of positions from the games that I played in the simul last fall.
I was invited to give a short presentation of my book Chess Exam and Training Guide and do a simul at the North Penn Chess Club (http://www.npchessclub.org/) back in the fall. I've battled 22 or so players of various levels in a nice friendly atmosphere. At the end, I was lucky to give out just one draw and win the rest of the games. From my memory, I stored a few of the interesting examples from that simul.
Example
#1
A
very sharp position is the toughest to deal with during the simul, especially
when you go around in circles taking 5-10 seconds on each move. When I came over
to the next board (see the position below) and saw my opponent's last move 1.
Pc5, I felt dizzy.
|
Diagram 1 Black to Move How do you assess the position? What should Black do?
|
Please stop – SOLUTION is below.
First,
I was angry at myself for placing the K on its ‘natural’ square e7 instead of
e8 on the move before. K on e7 allows PxB with check. As, I tried to calm myself
down, I realized that 1…Bxe2 loses 2.Pxd6+ Kd7 3.Rxc8 Bxf3 (3….Kxc8
4. Kxe2) 4. Rf8 etc… A reasonable attempt would have been 1…Rxc5
2. Rxc5 Bxe2 3.Rc3 Ba6 and Black is probably not worse.
Then
there were two moves with the B on d6 - 1…Bxc5 and 1…Be5. The
best move was 1…Be5
after 2. Nxe5 Bxe2,
Black preserves the extra pawn and winning chances. So, why did I play 1…Bxc5?
Well, I was planning to respond to 2.Bxa6 with the clever 2…Bb4!???
3. axb4? Rxc3 winning the R for 2 pieces and staying ahead, since I already
had two extra pawns. I did see that 2…Bxf2+? was not sufficient as
after 3.Kd2 the Rc3 is defended and Black is down a piece. The Nf3 is
conveniently stops 3…Be1+. Only after I played 2…Bxc5, I
realized that the B from a6 will be attacking my Rc8
after 2. Bxa6 Bb4?? 3.Bxc8, so I prepared myself to settle for the
tough endgame after 2…Bxf2+.
Somehow, my opponent panicked and instead of 2.Bxa6, played 2.Rxc5?? After 2…Rxc5 3.Bxa6 Ra5 the Black R was dominating two minor pieces.
===================================================================
Example #2
Take a look at the next diagram -
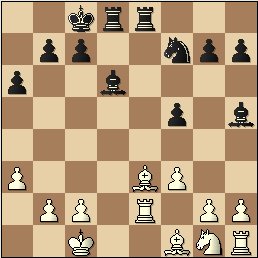 |
Diagram 2 Black to Move Black is way ahead in development, but is he winning already? What should he play?
|
Please stop – SOLUTION is below.
Indeed, Black is winning thanks to his overwhelming advantage in development. The combination type is Attraction into Pin. 1….Rxe3 2.Rxe3 Bf4. The Re3 can't be defended. Black won a Bishop and kept all of his positional advantages.
===================================================================
Example #3
Now, onto the next position -
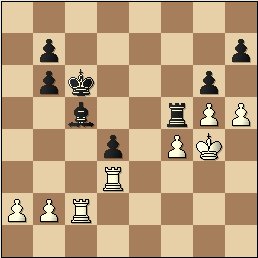 |
Diagram 3 White to Move White is so winning that it is easy to relax mentally. I'd recommend before you do this to find a finishing "punch". Do you see it? |
Please stop – SOLUTION is below.
With
the K-side temporarily 'frozen', we should shift our focus to the Pin of the
Bc5. Once you notice it, you should find two moves candidates 1. Pb4 and 1.
Rxd4. When I came up to the board I spent all of 1/2 seconds and played 1.Rxd4.
Black has no counterplay and is doomed.
White
is already way ahead in material and wining a B for a P is not that important to
begin with. Moreover, after after 1.Pb4 Kd5 2. Pxc5 Pxc5 White would all
of a sudden have to worry about the 3-pawns avalanche coming down. Of course,
upon closer examination, we can see that White can take care of Black with some
timely decisions 3.Rb3 etc...
This is a perfect example where some (but not all) computers may disagree with my logic and I really don't care as I like my practical approach.
The bottom line - go for sure things and save your energy. There is an old joke that you may have heard a few times - if your choice on the next move is to take a Queen without any compensation or announce a checkmate in two moves - take the Queen. Upon closer examination, the checkmate may not be there.
===================================================================
Example #4
Next examples deals with the Middlegame position. Take a look -
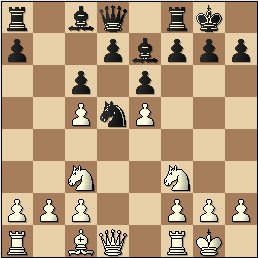 |
Diagram 4 Black to Move How would you assess the position? What would you play as Black?
|
Please stop – SOLUTION is below.
Well,
Black should recapture the pawn. However, just before that, he has a simple
in-between move that inflicts damage on White's pawn structure - 1…Nxc3
2.Pxc3 Bxc5 and the position is Dynamically Balanced. White
has some initiative and space advantage as well as the target on the d-file.
Black has potential with two bishops and weak White pawns.
====================================================================
I have several more interesting examples form the simul and plan to share them with you next time.
To be continued.......
How did you do? For comments send email or this
form
More on chess training (serious and enlightening)
| Chess Exam and Training Guide $24.95 + shipping | Chess Training Services |
Copyrighted @ 2006 Igor Khmelnitsky
For comments or permission to reprint please send inquires via email or this form