Improve your Chess via Active Learning
ACTIVE LEARNING is any strategy that involves students in doing things and thinking about the things they are doing (*)
You could study the following material either by skipping the test and going directly to the lecture. Or start by attempting to figure out on your own what is going on in each of the positions I will be talking about and then proceed to the lecture. If you chose the latter, spend 5-15 minutes on each diagram and record your evaluation and move / plan for the side whose turn it is and sample variations. Then compare your ideas with mine. Let me know how you like the test and the lecture
Test yourself:
All Positions:
1. Check whose move it is / Read the question.
2. Evaluate position (i.e. White is Better, or Black is Winning, or Equal...)
3. Find the Best move and, if necessary, support it with variations. <<CALCULATE thoroughly!!
4. Answer the question (if there is a specific one)
|
|
|
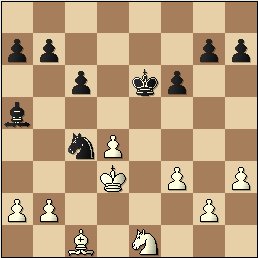
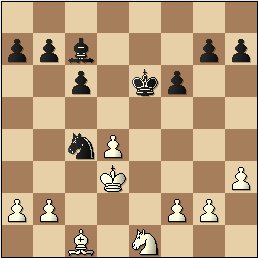
| #1. Black to Move. What would you play? | #2. What happens after 1...Bc7-a5? |
|
|
|
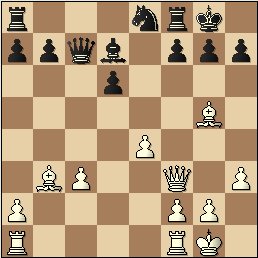
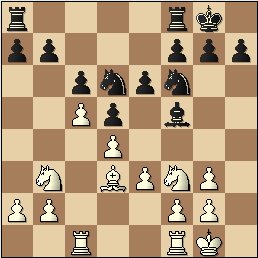
| #3. What happens after 1.Bg5-e7? | #4. Black just played 1...Bg4-f5, what should White do? |
STOP - Lecture begins below.
Desperate Measures
When a threat is met by a counter-threat, precise calculation is required. One possibility is yet another counter-threat, when a piece that was attacked, finds a target and gives itself up no matter how valuable that target was. The latter method is a variation of an intermediate move and is called "desperado".
Consider #1, Black gains nothing if he captures the White Knight as he loses his own Knight. Instead, he finds a way to get something (even if it isn't much) for his Knight before capturing on e1. After 1...Nxb2+! (the Black Knight is called 'desperado') 2.Bxb2 Bxe1, Black is up by a pawn and has good winning chances.
The above example (#1) is a slightly
modified version of #2, which actually happened in Lasker,E - Euwe,M
(Nottingham, 1936). Rather than addressing the threat to his Knight, Black
played 1...Ba5. Unlike in #1, the White Knight doesn't have even an
insignificant target. So, does Black's idea work? Well, not really. Using an
intermediate move to create interference and decoy, White 'invites' the target
for his Knight. After 2.b4! Bxb4 3.Nc2, both Black pieces are under
attack and he loses one of them. Euwe resigned 8 moves later/
#3 is an example from the game played by my student (1600). White can go after the rook on f8 via 1.Be7, but is this the right idea? Does Black have any defensive resources? In fact, he does have two solid move-candidates that White must evaluate before committing to 1.Be7. The two moves I am talking about are 1...Bb5 and 1...Bg4. You must identify these moves and calculate accurately all subsequent variations. After, 1...Bb5 2.Bxf8 Bxf1, we have a situation that calls for desperado. The White Bishop has two targets - d6 and g7, unfortunately, in either case Black can continue 'desperado' of his own. In fact, between the two options that White has, the more obvious one is not the best - 3.Bxd6? Bxg2 and Black is OK. If you realized that White isn't gaining any material, then by using 'desperado' 3.Bxg7 Bxg2 4.Kxg2, White could at least gain positional advantage. That is the final assessment of 1...Bb5.
After 1...Bg4 (intermediate move with discovered attack), the situation is a lot simpler. The White Queen doesn't have any targets and can't even think of a desperado since White is threatening only a Rook. After 2.Qxg4 (or 2.hxg4) Qxe7, position is approximately equal.
Hence, the conclusion of our analysis - 1.Be7 with the best play leads to approximately equal position. White should make a different move and keep his dark-squared Bishop. By preserving the Bishop pair in the open position, White keeps better chances.
Example #4 shows one of the rather altruistic desperadoes. In the game Hort,V - Dueckstein,A (Veseli nad Moravou, 1967), White unloaded 2.Ba6!!, seemingly adding to the chaos on the board. However, as the initial shock settles, we see a simple resolution - capturing the Bishop leaves Black's pawn structure in ruins, while moving the Knight leads to losing the key Pawn on b7. Black chose the latter and played 2...Nc4! Instead going for complications after 3.Bxb7 Rb8, White steered the game into a simpler flow via 3.Bxc4 bxc4 4.Na5. Soon thereafter, the Pawn on c4 fell. White converted his advantage after another 20 moves.
Summary: the 'Desperado' idea is not complicated and usually short and easy to calculate. You need to be aware of this idea and always be on the lookout to execute it. If you do, I will not be surprised if in the near future you can execute your own beautiful yet simple Ba6!!
==============================================================================================
What do you think about this article? How did you do? For comments send email or this
form
More on chess training (serious and enlightening)
|
|
Chess Exam and Training Guide (2004) $24.95 + shipping Chess Exam and Training Guide: Tactics (2007) $19.95 + shipping CE + CE Tactics (Holiday Special! Free chess cartoon calendar $8, while supplies last) - $39.95 - insured shipping in US is included |
Copyrighted @ 2008 Igor Khmelnitsky
For comments or permission to reprint please send inquires via email or this form
(*Bonwell, C., & Eison, J. (1991). Active learning: Creating excitement in the classroom (ASHE-ERIC Higher Education Report No. 1). Washington, DC: George Washington University, p. 2)
