

Improve your Chess via Active Learning
ACTIVE LEARNING is any strategy that involves students in doing things and thinking about the things they are doing (*)
You could study the following material either by skipping the test and going directly to the lecture. Or start by attempting to figure out on your own what is going on in each of the positions I will be talking about and then proceed to the lecture. If you chose the latter, spend 5-15 minutes on each diagram and record your evaluation and move / plan for the side whose turn it is and sample variations. Then compare your ideas with mine. Let me know how you like the test and the lecture
Test yourself:
The question - Is sending the King to the corner (to h8) a safe choice? Is this move also the best or equal best choice?
1. Check whose move it is / Read the question.
2. Evaluate position (i.e. White is Better, or Black is Winning, or Equal...)
3. Find the Best move and, if necessary, support it with variations. <<CALCULATE thoroughly!!
4. Answer the question (if there is a specific one)
|
|
|
|
| #1. White to Move. | #2. White to Move. | #3. Black to Move. |
|
|
|
|
| #4. Black to Move. | #5. Black to Move. | #6. Black to Move. |
|
|
|
|
| #7. White to Move. | #8. White to Move. | #9. Black to Move. |
|
|
||
| #10. Black to Move. |
STOP - Lecture begins below.
King in the Corner - Trapped or Safe?
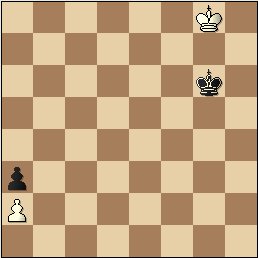
Recently I saw the following endgame in one of my favorite publications - daily e-paper ChessToday (www.chesstoday.net). See the diagram #10
|
|
 |
 |
 |
| #10 | 10-a | 10-b | 10-c |
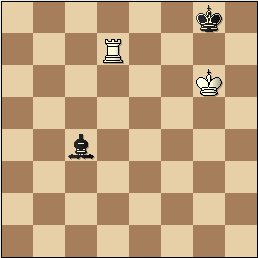
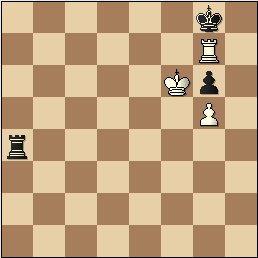
Muzychuk,A - Batsiashvili,N; Euro Champ (w), 04.2008; Black to move.
This endgame should end in a draw. Black will lose the g-pawn, still, as long as the Black King can stay in front of the pawn, the draw is guaranteed. A simple setup would be - Black Kg8 or Kh8 and the rook on 8th rank (diagram 10-a). I guess, going to the corner looked unappealing to the player and she played 1...Kf8, which was the losing move! What was your answer to the number #10?
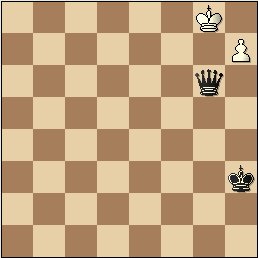
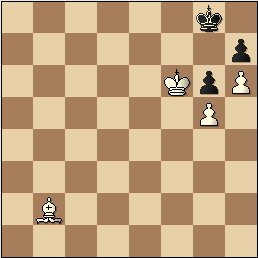
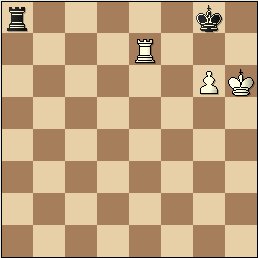
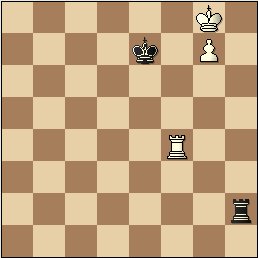
1...Kf8?? [1...Kh8= 2.Re7 Kg8 3.Kxg6 Ra6+] 2.Kxg6. Now White can force the Black King away from g8, get his own King there and eventually build the Lucena position 2...Rg4 3.Ra7 Rg1 4.Ra8+ Ke7 5.Rg8 Rg2 6.Kh7 Rg3 7.g6 Kf6 8.Rf8+ Ke7 9.Rf4 Rh3+ 10.Kg8 Rh2 11.g7 (Diagram 10-b) Now the white king escapes from g8 and also from the pesky Black Rook 11...Rh1 12.Re4+ Kd7 13.Kf7 Rf1+ 14.Kg6 Rg1+ 15.Kf6 Kd6 [15...Rf1+ 16.Kg5 Rg1+ 17.Rg4 (Diagram 10-c)] 16.Rd4+ Kc5 17.Rf4 1-0
| As I was reviewing the above example, I
immediately thought of another position that you may have seen if
various books, including my own
Chess Exam (2004)
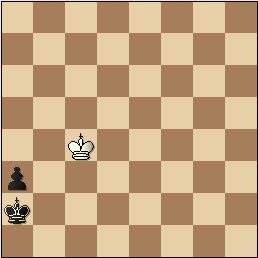
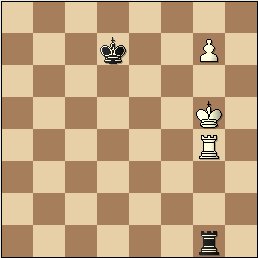
- take a look at the position #1 (Shakman 1924). What was
your answer to my question? The corner is not only safe, but also is the only move for White here. A quick calculation should show that Black is easily winning the a2 pawn. To save the game, the White King must arrive on c2 (c1) just after the pawn a2 is being captured and before the Black King escapes from the corner. This is tough though - 1.Kh8!! (Safe and the Best) [1.Kf8? Kf6 2.Kg8 Ke5 3.Kf7 Kd4 4.Ke6 Kc3 5.Kd5 Kb2 6.Kc4 Kxa2-+ (Diagram 1-a) 7.Kc3 Kb1 and Black is winning] 1...Kf6 2.Kh7! Ke5 3.Kg6 Kd4 4.Kf5 Kc3 5.Ke4 Kb2 6.Kd3 Kxa2 7.Kc2 Ka1 8.Kc1 a2 9 Kc2 Stalemate |
1-a |
The #2 should have been fairly straight forward. 1...Kf8?? leads to losing the last pawn, whereas 1.Kh8! (Safe and the Best) leads to a standard draw. Black doesn't have time to get his King closer as White is stalemated.
The #3 also should have been fairly straight forward. 1...Kh8?? (Unsafe) leads to an instant checkmate 2.Kf7#. Whereas 1...Kf8 is a standard draw. White can't force the Black King out of the corner.
The #4 is a bit tricky - 1...Kh8 (Safe and Equal Best) leads to a standard drawing position. In the endgames K+B vs. K+R, one simple defensive method is to get the King into the corner of the color opposite to the Bishop. After 2.Rd8+ Bg8, White can't make any progress. Also not dangerous is 3.Rh7+ Kg8 4.Rc7 (a double attack) due to 4...Bd3+ breaking the mating setup. Please note that 1...Kf8 is also a safe option.
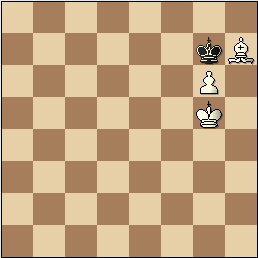
The #5 should have been fairly straight forward. After 1...Kf8?? 2.Kf6, the pawn gets through. Instead after 1...Kh8! (Safe and the Best), White can't make any progress as any attempt to get his King closer (i.e. 2.Kf6) results in stalemate. Giving up the Bishop, leads to a standard draw - 2.Bg8 Kxg8 3.Kf6. Now we see the position from the diagram #6.
#6 Here 1...Kf8 is a simple draw - 2.g7+ Kg8 3.Kg6 Stalemate. It might be somewhat unexpected, but 1...Kh8 (Safe and Equal Best) is also good. 2.g7+ leads to the same position as mentioned in the above (after 1...Kf8), while after 2.Kf7, we have stalemate.
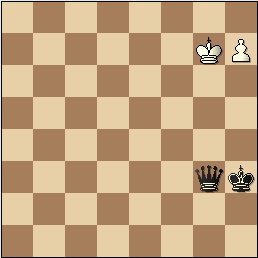
The #7 may let you think of a similar plan as in the #2, however, sending the King to the corner here is way too premature! 1.Kh8?? (Unsafe) allows the Black King to gain grounds and make two 'huge' steps towards the White King. After 1...Kg4 2.Kg7 Kf5+, the Black King is so close, that White can't survive. Here is a sample line - 3.Kf8 Qd6+ 4.Kf7 Qd7+ 5.Kg8 Kg6 6.h8N+ (6.h8Q Qf7#) 6...Kf6 7.Nf7 Qxf7+ 8.Kh8 Qg7# Instead, 1.Kf7 or 1.Kf8 doesn't allow the Black King to move. The best Black can do is to start making checks and ultimately reach the position from the #2. Only there, as we already have seen, Kh8 is a safe and only move.
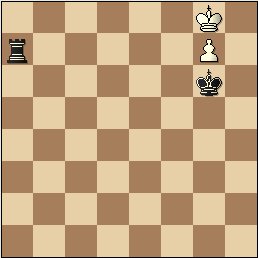
The #8 should have been fairly straight forward. 1.Kf8?? leads to losing the last pawn after 1...Rxg7. Instead 1.Kh8! (Safe and the Best) leads to an immediate draw. 1...Rxg7 - stalemate or 1....Ra8+ 2.g8=Q Rxg8.
Finally in the #9 Black is ready to announce the checkmate, but first he must address the check. Here 1...Kh8?? (Unsafe) leads to an instant checkmate 2.Rh7#. Whereas 1...Kf8, unfortunately for Black, leads to only a draw due perpetual check - 2.Nh7+ Ke8 3.Nf6+ Kf8 4.Nh7+.
Summary: sending your King to the corner often may seem too dangerous or even counter-intuitive. While sometimes the King can be mated in the corner, in other times, he may find it to be the safest place, mainly due to a stalemate idea. Don't just rely on your feelings, attempt to calculate some key variations. Also, memorize several of the standard ideas I showed you in this article.
==============================================================================================
What do you think about this article? How did you do? For comments,
corrections send email or use this
form
More on chess training (serious and enlightening)
|
|
Chess Exam and Training Guide (2004) $24.95 + shipping Chess Exam and Training Guide: Tactics (2007) $19.95 + shipping CE + CE Tactics (Holiday Special! Free chess cartoon calendar $8, while supplies last) - $39.95 - insured shipping in US is included |
Copyrighted @ 2008 Igor Khmelnitsky
For comments or permission to reprint please send inquires via email or this form
(*Bonwell, C., & Eison, J. (1991). Active learning: Creating excitement in the classroom (ASHE-ERIC Higher Education Report No. 1). Washington, DC: George Washington University, p. 2)