#1. White to Move.
#4. White to Move.
| Check my new site www.chessIK.com - daily puzzles that will help you improve! Comprehensive chess assessment - answer 100 questions, get 90+ rating reports. |
Improve your Chess via Active Learning
ACTIVE LEARNING is any strategy that involves students in doing things and thinking about the things they are doing (*)
You could study the following material either by skipping the test and going directly to the lecture. Or start by attempting to figure out on your own what is going on in each of the positions I will be talking about and then proceed to the lecture. If you chose the latter, spend time on each diagram and record your evaluation and move / plan for the side whose turn it is and sample variations. Then compare your ideas with mine. Let me know how you like the test and the lecture
Test yourself:
Level - beginner through advanced.
1. Check whose move it is / Read the question.
2. Evaluate position (i.e. White is Better, or Black is Winning, or Equal...)
3. Find the Best move and, if necessary, support it with variations. <<CALCULATE thoroughly!!>>
4. White goes from bottom to top, a1 is the lower left corner.
|
|
|
|
|
#1. White to Move. |
#2.White to Move. | #3. White to Move. |
|
|
|
|
|
#4. White to Move. |
#5. Black to Move. | #6. White to Move. |
STOP - Lecture begins below.
"If you can't stop the P, ... prepare to battle against the Q!" .
|
|
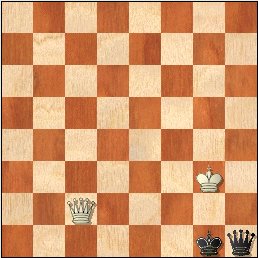
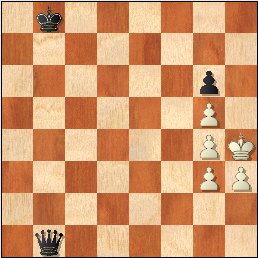
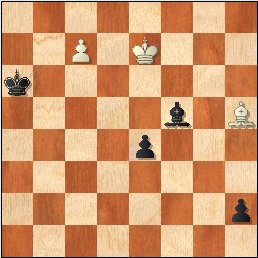
#1. White
to Move - Training Example
The Black P is closer to promotion, but, because of the skewer, it
is White who gets the Q first and can play for a win. After 1.d7
Kd3 [1...d1Q?? 2.d8Q+ Ke3 3.Qxd1] 2.d8Q+, White
has a theoretically won setup - Q vs. K+P on 7th, when the P isn't
on the B-file or R-file. This rule is covered in every basic endgame
book and is beyond the scope of this article. I do show a sample
play in the
attached PGN file. Example
1. So, the rule says White wins, however, there are exceptions - and
this is one of them. After 2...Ke2, White doesn't have a
single check, thus can't prevent ...d1Q with a draw. So, Black
escaped by taking advantage of the White's unfortunate setup.
|
A P endgame can often result in a K+Q vs. K+P setup, similar to the examples below. Sometimes, you can't stop the P, but there are other winning ideas. Something as simple as K+Q vs. K+Q endgame can be won. However, the K of the stronger side must be nearby for these ideas to materialize.
|
|
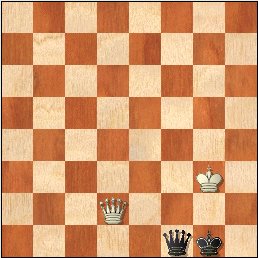
#2. White
to Move - Training Example
In this example, White can make a bunch of checks and even force the
Black K to h1 (by eventually arriving to g3 with check), but,
because of the stalemate, White must let the K out on the very next
move, instead of improving his K. Hence, White must employ a
different plan - instead, he allows the Black Q to arrive and traps
the Black pieces in the corner - 1.Qc2+ Kg1 [1...Kg3 2.Qd1
Kg2 3.Qe2+..., doesn't change anything] 2.Kg4 h1Q 3.Kg3.
Black to move, but he can't avoid checkmate.
|
After 3.Kg3 |
|
|
#3. White
to Move - Training Example
This example is similar to
#2, but with a couple of little twists.
Firstly, the future Q won't be in the corner and, secondly, it doesn't even have to be the Q! White must be careful, as the direct 1.Kg3?? is met by 1...f1N+ with a draw. Hence, White should play 1.Kf3(h3)! After 1...f1Q+ 2.Kg3, Black is done!
|
After 2.Kg3 |
|
|
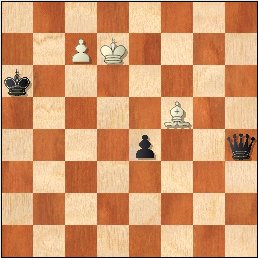
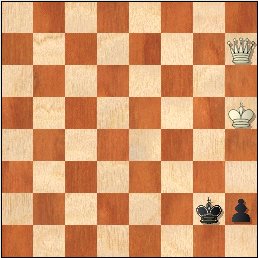
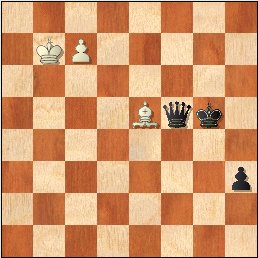
#4. White
to Move - Troitsky
In the following example,
White can't stop the h-P, while his own P is secured by the
Black B. However, after 1.Bg6! h1Q 2.Bxf5, the Black Q
can't show its strength due to a poor placement.
On the other hand, White is threatening promotion with check, severely limiting Black's options. After 2...Qh4+ 3.Kd7, the checks are over and Black is no longer ahead. In fact, Black will need to play the accurate 3...Qh8 to secure a draw.
|
After 3.Kd7 |
|
|
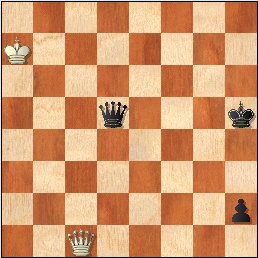
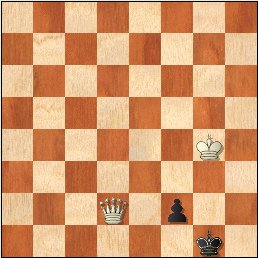
#5. White
to Move - Jansa,Vlastimil -
Alatortsev,Vladimir (1965)
In this example, Black
decided to allow the promotion, instead of launching a series of
checks, which likely would not offer a different winning plan.
After 1....Qxe5 2.c8Q, the White Q has several checks available. Hence, Black played 2...Qd5+!!, centralizing the Q, and taking away a number of checks, and defending h1. After the White K moved, Black played 3...h2. Next, 4.Qc1+ Kh5! and the checks were over. White couldn't stop h1Q and had no counterplay, or stalemate. Black won! |
After 4...Kh5 |
Obviously, if you don't have any counterplay, then there is almost nothing you can do when your opponent gets a new Q. Perhaps only the following idea comes to mind - self-stalemate:
|
|
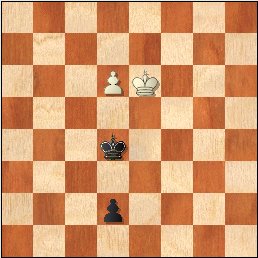
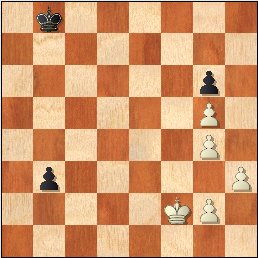
#6. White
to Move - Training Example
The White K can't stop the
b-P. Still, White can escape by building a nice fortress for the
K.
1.Kg3 [1.Ke3?? b2-+] b2 2.Kh4! b1Q(R) 3.g3= as Black can't make progress. |
After 3.g3 |
==============================================================================================
Summary:
==============================================================================================
PGN with games
What do you think about this article? How did you do? For comments,
corrections send email or use
this
form
More on chess training (serious and enlightening) in my books:
|
Special offer:
Chess
Exam You vs. Fischer: Autographed and Personalized (when requested), 2011-2012 Chess
Cartoon Calendar ($8) + Free Shipping via Insured Media Mail - (orders
of over $50) |
|
Special offer:
Chess
Exam package: Great Present - Chess Exam and Chess Exam Tactics,
Autographed and Personalized (when requested), 2011-2012 Chess
Cartoon Calendar ($8) + Free Shipping via Insured Media Mail -
|
|
Special offer: Get all three Chess Exam books autographed and personalized + meet me for 30 min of one-on-one Phone and/or Skype and/or ICC training session for $95 ($125 value), non-US - please add another $35 for shipping with insurance. |
|
|
Chess Exam and Training Guide (2004) |
Copyrighted @ 2011 Igor Khmelnitsky
For comments or permission to reprint please send inquires via email or this form
(*Bonwell, C., & Eison, J. (1991). Active learning: Creating excitement in the classroom (ASHE-ERIC Higher Education Report No. 1). Washington, DC: George Washington University, p. 2)
 After 2...Ke2