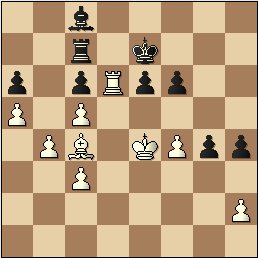
Diagram 5 Black to Move
How would you assess the position? What move would you play?
One vs. Many => Examples a Plenty! (conclusion)
Last time I showed you some interesting examples from the games I played against the members of North Penn Chess Club in Lansdale, PA. In this article I will show some more examples from that simul.
Example
#5
In this endgame, White just played 1. Ke4.
|
Diagram 5 Black to Move How would you assess the position? What move would you play?
|
Please stop – SOLUTION is below.
As
much as I liked my position (White), I had no clear idea how to make a progress.
Black is worse here, but he can maintain his resistance. The Bc8 is guarding Pa6
and Pe6 and can’t move. The Rc7 is guarding Pc6, but can move to a7, since
2.Rxc6? is bad due to 2…Bb7. 1…Kf7? Runs into 2.Pf5! The pawn moves on the
K-side result in loss of flexibility and lead to creation of holes. 1…Pf5+
2.Ke5 or 1…Ph3 2.Ke3 aiming at g3. Finally, after 1…Pg3 (was played
in the game!) 2.Pxg3 Pxg3 3.Rd3! White quickly won the g-pawn and the
game. Thus by process of elimination we can conclude that 1…Ra7
was the best choice and Black’s position is passive, but sound.
Summary – when your position is passive, but solid, try to keep it that way. Any unprepared activity could backfire.
===================================================================
Example #6
Take a look at the next diagram -
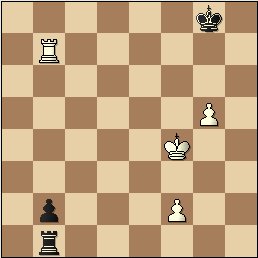 |
Diagram 6 White to Move What result do you expect? What should White play?
|
Please stop – SOLUTION is below.
This
position tests your knowledge of basic rook endgames. I’d like to hear that
you were able to answer correctly and very quickly! The pawn on b2 is dangerous
and must be tamed in a certain way. Winning the pawn on b2 would lead to an
easily won R+2 vs. R endgame, but if you have to give up one of your
pawns for it, it would likely lead to a drawn position.
Thus
not only you must watch out for checks that the Black Rook can make, but also
for any other Rook moves that attack one of your pawns.
These
nuances seem to create a lot of problems even when you have two connected pass
pawns and the K nearby. That is unless you know this basic idea - keep one of
your pawns on the 2d rank and send your King and the other pawn forward!
White wins easily after 1. Kf5 then Kf6 then Pg6. After 1…Rf1 2.Rxa2 White R defends the Pf2 (that is why we kept the pawn on the 2d rank!)
Summary - learn your basic endgames!
===================================================================
Example #7
Now, onto the next position -
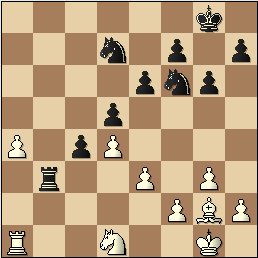 |
Diagram 7 Black to Move How
do you assess position? What should be Black’s plan? Next Black’s
move? |
Please stop – SOLUTION is below.
This is an interesting endgame.
Black is better because of his active Rook, solid pawn structure and advantage
of two 2 Ns over N+B in this closed position. White has one major plus – the
pass a-pawn supported by the Rook. He also may try to break through via e3-e4 in
hopes to either activate his B after d5xe4 or create a weakness on d5 after
e4xd5.
So, my plan was
And I played 1…Nb8. Below is how the game progressed based on my recollection. If you are interested, you can practice the starting position against a friend or computer. 2.a5 Na6 3.Bf1 Kf8 4.f3 Ke7 5.Kf2 Kd6 6.Ke1 Ne8 7.Kd2 Nec7 8.Be2 Nb5 9.Kc2 Kc6 10.h4 Na3+ 11.Kd2 Kb5 12.Nc3+ Kb4 13.Nd1 Kxa5 14.Ra2 Kb4 15.Rb2 c3+ 0-1
Summary - it often helps to neutralize your opponent's pluses in the earlier stages of your plan.
===================================================================
Example #8
Next example deals with the Endgame. Take a look -
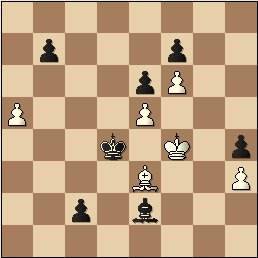 |
Diagram 8 Black to Move Do you think Black can win? What should be Black’s plan? Where would you move the King?
|
Please stop – SOLUTION is below.
The
opposite color B endgame is always tricky. Since majority of the White pawns are
on dark squares, his B could attempt to defend them, while preventing c1Q. White
K, if given a chance, would go after Ph4 or/and Pf7. However, the latter is less
likely, since Black B could easily defend it from g6.
Now,
specific plans for Black –
Now
that we outlined all plans, let's proceed. We know that plan 1 is bad. Plan 2
seems OK, but we need to calculate. If you selected 1…Kd3 or 1…Kc3 after
careful calculation, your decision is correct. If you played one of these moves
without any calculation, your decision-making could be improved. Plan 3 seems
pretty good too and requires no real calculation, just a basic setup – Kd5 and
Bf1.
====================================================================
Example #9
Next example deals with the early Middlegame position. Take a look -
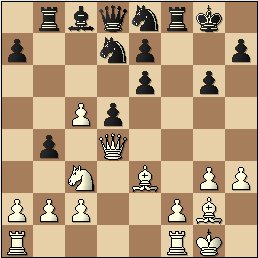 |
Diagram 9 White to Move How do you evaluate the position? What should White do?
|
Please stop – SOLUTION is below.
Black’s position is a
super-mess! Weak King, mainly due to absence of the Bg7, misplaced pieces and
doubled pawns – just to name a few of his problem things. White, on the other
hand, a picture perfect setup – well developed, pieces are ready for attack
and unbalanced pawn structure that enables dynamic shots. Specifically, White
has various sacrifices on d5, advance of c-Pawn and an easy way to build
pressure on the e-file.
In the game, White played
crushing 1.Nxd5. Black didn’t take the N and very soon resigned.
However, taking the N wasn't a real option either. I hope you didn’t stop
after 1…Pxd5 2.Bxd5 Rf7 3.Bxf7+ conclduing that White wins the R+2
pawns for 2 minor pieces and keeps his strong attack. Nope, after 3…Kxf7,
White has 4.Pc6 and the Nd7 is lost due to the pin.
Summary – don’t give away your Bg7(g2) unless you are getting a lot in return. When ahead in development and opponent’s King is weak try to open up position, if necessary – with sacrifices.
====================================================================
How did you do? For comments send email or this
form
More on chess training (serious and enlightening)
| Chess Exam and Training Guide $24.95 + shipping | Chess Training Services |
Copyrighted @ 2006 Igor Khmelnitsky
For comments or permission to reprint please send inquires via email or this form